Redshift
Overview
Redshift is a SQL database from AWS which is generally compatible with standard Postgres. Qarbine uses the Postgres node.js driver for interacting with Redshift. A discussion on compatibility can be found at https://docs.aws.amazon.com/redshift/latest/dg/c_redshift-and-postgres-sql.html
Redshift Configuration Information
Overview
For access you need to determine your Redshift information which includes
- network accessibility,
- URL,
- port number,
- account name,
- account password,
- Schema (optional), and
- database.
Network Accessibility
Check to make sure you have less than 5 Elastic IPs allocated in your account (the hard limit). The logs note: > When you turn on the publicly accessible setting, Redshift creates an Elastic IP address. If you have 5 EIPs already, it will fail to create another one.
Determine the connection string for a cluster
Sign in to the AWS Management Console
Open the Amazon Redshift console at https://console.aws.amazon.com/redshiftv2/.
On the navigation menu, choose Clusters.
Choose the cluster name from the list to open its details.
Select the workgroup of interest.
On the information page copy the endpoint.

Paste it into a temporary location.
Make sure the Redshift Serverless endpoint is publicly accessible, or that your current IP is allowed. To check:
- Go to the AWS Console → Amazon Redshift → Workgroups
- Select your workgroup (default-workgroup)
- Under Network and security settings, confirm:
- Publicly accessible is enabled.
- A VPC endpoint isn't blocking public access.
- A security group or VPC firewall allows your IP on port 5439.
Access Credentials
User and Password
Use an account name and password as the access parameters.
IAM Credentials for Serverless
The prerequisites are:
- Your Redshift instance must have IAM authentication enabled (the serverless default).
- Your IAM user/role must have permission to call redshift:GetClusterCredentials
For the second item include this at a minimum in the server options
accessKeyId = 'AK…XI',
secretAccessKey = 'l3…Xd',
Optionally include a region value.
For serverless workgroup level authentication conclude
workgroup = 123123123
For serverless authentication see https://docs.aws.amazon.com/redshift/latest/mgmt/serverless-connecting.html
and https://docs.aws.amazon.com/redshift/latest/mgmt/serverless-iam.html
Otherwise, for cluster authentication include
cluster= 123123123
To view your cluster information see https://docs.aws.amazon.com/redshift/latest/mgmt/view-cluster.html
For more details see https://docs.aws.amazon.com/redshift/latest/mgmt/generating-user-credentials.html
To create a readonly user
CREATE USER readonly_user PASSWORD 'yourStrongPassword123';
Amazon Redshift does not provide a single command to grant a user or group access to all schemas at once. You must issue GRANT statements for each schema individually.
Run
GRANT USAGE ON SCHEMA public TO readonly_user;
GRANT SELECT ON ALL TABLES IN SCHEMA public TO readonly_user;
For each current schema
GRANT USAGE ON SCHEMA tickit TO readonly_user;
GRANT SELECT ON ALL TABLES IN SCHEMA tickit TO readonly_user;
To obtain access for added schema run
ALTER DEFAULT PRIVILEGES IN SCHEMA public
GRANT SELECT ON TABLES TO readonly_user ;
Qarbine Configuration
Compute Node Preparation
Determine which compute node service endpoint you want to run this data access from. That URL will go into the Data Service’s Compute URL field. Its form is “https://domain:port/dispatch”. A sample is shown below.

The port number corresponds to a named service endpoint configured on the given target host. For example, the primary compute node usually is set to have a ‘main’ service. That service’s configuration is defined in the ˜./qarbine.service/config/service.main.json file. Inside that file the following driver entry is required when using the MySQL interaction.
"drivers" :[
 . . .
"./driver/postgresDriver.js"
]
The relevant configuration file name for non primary (main) Qarbine compute nodes is service.NAME.json. Remember to have well formed JSON syntax or a startup error is likely to occur. If you end up adding that entry then restart the service via the general command line syntax
pm2 restart <service>
For example,
pm2 restart main
or simply
pm2 restart all
Data Service Definition
Overview
Open the Administration Tool.
Navigate to the Data Services tab.

A data service defines on what compute node a query will run by default along with the means to reach to target data. The latter includes which native driver to use along with settings corresponding to that driver. Multiple Data Sources can reference a single Data Service. The details of any one Data Service are thus maintained in one spot and not spread out all over the place in each Data Source. The latter is a maintenance and support nightmare.
To begin adding a data service click

On the right hand side enter a name and optionally a description.

Main Properties
Set the Compute URL field based on the identified compute node above. Its form is “https://domain:port/dispatch”. A sample is shown below.
Choose the driver and set the values as shown below.

The available driver option is
serverless = boolean
The default is true.
Enter the value for the server template.

Enter server options as shown below

The “ssl=true” option is important for Redshift Serverless connections.
Authentication Options
For IAM authentication specify
useIamCredentials = true,
accessKeyId = 'AK…XI',
secretAccessKey = 'l3…d',
durationSeconds=123
For serverless enter a workgroup and for a dedicated cluster enter a cluster. Optionally specify a region. The database access is governed by the IAM identity (user or role) that requests the credentials. You grant access by attaching IAM policies (such as redshift-serverless:GetCredentials) to your users or roles. Only principals with the correct IAM permissions can obtain temporary credentials and connect to the database.
To use serverless authentication make sure to define
workgroup = workgroupId,
For serverless oriented authentication details see // https://docs.aws.amazon.com/redshift-serverless/latest/APIReference/API_GetCredentials.html
and https://docs.aws.amazon.com/redshift/latest/mgmt/serverless-connecting.html
Otherwise to use cluster authentication add
cluster =clusterId,
For cluster oriented authentication the IAM authentication must be turned on. For more details see https://docs.aws.amazon.com/AWSJavaScriptSDK/v3/latest/client/redshift/command/GetClusterCredentialsCommand/
On the backend the credentials last for the given duration number of seconds. The default is 900 seconds (15 minutes),The max is 3600, 1 hour. Qarbine automatically renews credentials at the end of the time period.
Data Options
The data options are also a CSV list of key=value pairs.You can set the schema context as shown below.

With it set the schema referenced becomes the first element in the search path. By default, the search path is "$user", public, where "$user" is replaced by the current session user's schema, if it exists.
The Redshift search path is a session-level setting that determines the order in which schemas are searched when you reference a database object (such as a table or function) by an unqualified name (i.e., without specifying the schema). This mechanism allows you to control which schema Redshift looks in first when resolving object names, which is especially useful if you have objects with the same name in different schemas. For more information see https://docs.aws.amazon.com/redshift/latest/dg/r_search_path.html.
Database Option
Enter the database information into the field shown below.

All queries using this data service can only access objects (schemas, tables, etc.) within this database. To access another database, you must create a new data service specifying that database.
This setting is required. Unlike in Postgres, you can’t change the database context using “use DATABASE” with Redshift.
You can reference environment variables using the syntax %NAME%. Any strings should be quoted and the key\value pairs separated by commas.
Testing the Configuration
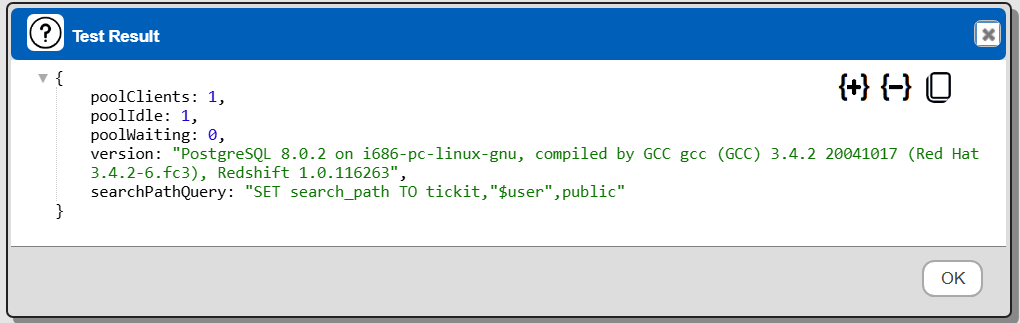
Test your settings by clicking on the toolbar image highlighted below.

The result should be something similar to the following
If you see
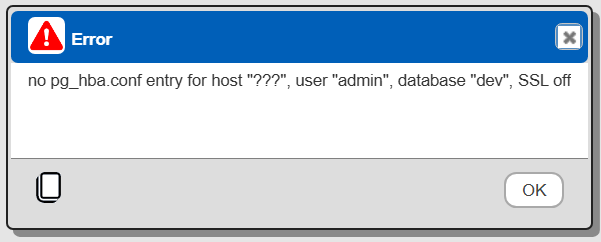
Then verify the server options have an “ssl” setting.
Saving the Configuration
Save the Data Service by clicking on the image highlighted below.

The data service will be known at the next log on time.
Troubleshooting
Here are some steps you can take to troubleshoot and potentially resolve connectivity issues:
- Verify the connection string: Ensure you're using the correct endpoint for your Redshift Serverless workgroup. The format should be: workgroup-name.account-number.aws-region.redshift-serverless.amazonaws.com
- Check security group configuration: Although you mentioned that all traffic is allowed on all ports, double-check that the security group associated with both your EC2 instance and Redshift Serverless workgroup explicitly allows inbound traffic on port 5439 (the default Redshift port).
- Verify VPC configuration: Confirm that your VPC has an internet gateway configured in its route table. Even though both EC2 and Redshift may be in the same VPC, proper routing is still necessary.
- Test connectivity: Try connecting to your Redshift Serverless using a database client like psql or a GUI tool from your EC2 instance. This can help isolate whether the issue is specific to your database creation script or a general connectivity problem.
- Check network ACLs: If you're using network ACLs, ensure they're not blocking the necessary traffic between your EC2 instance and Redshift Serverless.
- Verify DNS resolution: Although you mentioned DNS and hostname resolution are enabled, double-check that your EC2 instance can resolve the Redshift Serverless endpoint hostname.
- Consider using the Redshift Query Editor V2: As a troubleshooting step, try connecting to your Redshift Serverless from the AWS Console using Query Editor V2. If this works, it confirms that Redshift Serverless is accepting connections and narrows the issue to your EC2 instance's network configuration.
- Review IAM roles and permissions: Ensure that the IAM role associated with your EC2 instance has the necessary permissions to interact with Redshift Serverless.
Sample Data Sets
The TICKIT sample data set that Amazon Redshift documentation examples use is described at https://docs.aws.amazon.com/redshift/latest/dg/c_sampledb.html. The page includes a link on how to load the sample data.
Reference
See this page for more information https://docs.aws.amazon.com/redshift/